
Coolant concentration is an important factor to understand when dealing with metalworking fluids. Maintaining coolant concentration helps to prevent corrosion, stem bacteria growth and maintain tool life.
By monitoring your concentration, you are much more likely to maintain your coolant for longer, because you’ll be able to detect the early signs of deterioration. For instance, if you notice your metal cutting fluid dipping below 5% concentration then you could be at risk of bacteria issues – but because you’ve caught it early, you’re able to top up your coolant, and add some maintenance biocides to keep things healthy.
On the other hand, running a high concentration can get very expensive, without improving performance – so it’s critical to make sure you’ve got it right.
Let’s take a closer look.
Explore our Premium Metal Cutting Fluids
Explore Now
Why does the concentration of my coolant matter?
Concentration helps keep issues from getting out of control because it maintains the originally intended quantities of important properties within the coolant. Metal cutting fluids are a mixture of mineral oil (or synthetic polymers), EP (extreme pressure) additives, and a variety of other additives such as corrosion inhibitors, anti-foaming agents, and anti-bacterial chemicals. These additives help to keep your coolant healthy and performing smoothly.
When the concentration is too low
To do their jobs properly, these additives must be at the correct concentration. If they are too weak, they won’t be effective. For example, if there is not enough anti-bacterial agent to combat the growth of fungus and bacteria, then you’re likely to soon have a batch of foul-smelling coolant on your hands. Likewise, if you’re doing a high-pressure machining process and there isn’t the correct level of anti-foam chemicals, then you could end up with high levels of foam covering your workpiece and machine.
When the concentration is too high
On the other hand, coolant shouldn’t be at too high a concentration. When the concentration of your cutting fluid is too high, it often causes the coolant to have a high conductivity rate. This is going to cause issues such as unusual corrosion of both the workpieces and the machine. It’s important to note that a higher concentration than recommended does not necessarily mean better performance- increased oil does not mean better lubrication.
To look at it from a different perspective, a coolant has two main purposes – to cool (water) and lubricate (oils). For this to happen, there needs to be the right balance of water and oil. Higher concentrations of oil can make the cutting fluid less effective, especially for machine steels and grinding applications. With some coolants, such as semi-synthetics, you’re also going to get increased foaming.
Moreover, although the chemical additives within the coolant are at a relatively low concentration – around 0.05% - if the coolant concentration gets too high these chemicals can be dangerous and have the potential to cause harm to your workers.
On top of this, it’s also going to get very expensive, as you’re using more coolant within your solution.
So, how does concentration change?
First and foremost, we need to understand why the concentration of our coolant changes. If it didn’t change, we wouldn’t need to be worried about it. As it is, the concentration level in your tank currently is very likely not the same as it was when you first filled it up.
There are two reasons tanks lose volume – evaporation, and a technical term called ‘drag out’.
Evaporation
Evaporation is a very common problem in Australia and affects our coolant more than we realise.

Especially during hot summer months, evaporation can have a big impact on the concentration levels of our metalworking fluids. Evaporation does one thing to your tank, and one thing only – it removes water. This means that the remaining cutting fluid in the tank is at a higher concentration than when you first filled it up.
You can easily remedy this by topping up your coolant at a lower concentration – use our calculator here.
Drag out
‘Drag out’ is a technical term referring to the coolant that is removed with a workpiece when it is taken out of the machining process.
For example, if you’re cutting a piece of steel on a bandsaw machine, coolant flows over the bandsaw blade and into the cut. This then flows off the workpiece and into the sump except for a residual layer of oil that adheres to the workpiece. When the workpiece is removed so is the residual coolant, lowering the concentration of the tank bit by bit. You might be surprised at the impact this can have over a period of 6 months.
So, what does this mean? It means that you need to keep an eye on the concentration of your coolant because it's going to be constantly changing. And the best way to do this is by using a refractometer.
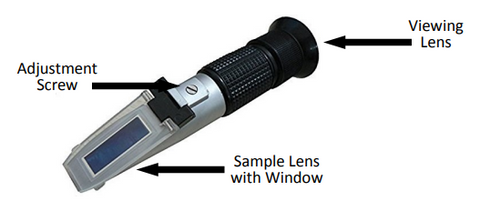
Using A Refractometer
According to Wikipedia, a refractometer measures the “index of refraction” which allows it to “determine the concentration.” Essentially, it measures the light that is passing through the liquid to work out how much other stuff is in it (such as oil).
There are two common types of refractometers – a manual and digital version. Both work by refracting light through a drop of the emulsion to give a reading in Brix scale.
To start with, it’s important to calibrate your refractometer.
Calibrating and using your refractometer
For a visual refractometer, put a drop of clean water on the sample lens, place the window over the top, and look through the viewing lens. Then turn the dial to 0. Now, place a drop of the emulsion onto the sample lens, aim towards the light, and read the scale.
For a digital refractometer, you calibrate it in much the same way. Place clean water on the testing area and read the Brix scale. If it’s not 0, use the ‘zero’ function. To measure, place a drop of emulsion on the testing screen, and press the ‘read’ button.

Reading and converting the refractometer
The reading you’ll get is called a Brix scale – this is not necessarily the actual concentration. We need to convert the Brix scale used on the refractometer to the actual concentration using a multiplier or factor. This is where things can get a bit confusing.
Most metal working fluids have a different refractometer index (or factor), determined by their oil content.

For example, all mineral-based coolant has an index of 1, meaning the Brix scale is equal to the real concentration. If you were using a mineral-based coolant, 2% Brix would equal 2% actual concentration.
However, semi-synthetics and full synthetics have differing indexes. If you were using a semi-synthetic coolant with an index of 1.78, 2% Brix would equal 3.56% actual concentration.
If you’re unsure what factor your cutting fluid is refer to the packaging of your coolant or look on the supplier’s website.
A table below shows Excision’s popular coolants and their refractometer factors.
|
Coolant |
Factor |
Example |
|
XDP 1000 |
1 |
2% Brix = 2% real concentration |
|
XDP 2000 |
1.78 |
2% Brix = 3.56% real concentration |
|
XDP 2100 |
1.81 |
2% Brix = 3.62% real concentration |
|
XDP 3000 |
3 |
2% Brix = 6% real concentration |
|
XDP 3200 |
1.78 |
2% Brix = 3.56% real concentration |
|
XDP 3800 |
1.72 |
2% Brix = 3.44% real concentration |
If these numbers seem too confusing, don't worry. We have a top-up concentration calculator you can use to work out the quantities you need to top-up.

Once you’ve worked out the concentration of your coolant, you need to check whether it’s in range. It should be within 1% of the recommended range for your fluid.
How often should I test my coolant?
We’d like to say test is as often as you can, but that’s not practical for everyone!

Ideally, you should test your coolant once a week – especially due to the higher evaporation rates in Australia. This will allow you to catch any deterioration in the cutting fluid very early and prevent your cutting fluid from going bad.
At a minimum, test every time before you top up. You should never top-up without knowing what the actual concentration of your coolant is, and what it should be.
Note that there are other ways to test coolant, such as pH testing, conductivity testing, and bacterial/fungal tests. These tests are usually done by a technician (such as Excision’s specialists), however we strongly recommend that all users test concentration using a refractometer for a foundational understanding of the health of your coolant.
FAQs
What does a coolant test do?
A coolant test checks certain parameters that measure the health of your coolant. This could include concentration levels, pH levels, and conductivity testing.
What is the best way to test coolant?
The best way to test the concentration levels of your coolant is by using either a digital or manual refractometer. Having your cutting fluid concentration outside the recommended range results in underperforming coolant, bacteria growth, unusual corrosion and increased foaming.
How do I check my coolant?
You can check your coolant by using sight and smell, testing the concentration, and doing advanced testing such as pH and conductivity levels (however these aren’t always necessary to determine the health of your fluid).
How do you know if your coolant is bad?
The fastest way to check if your coolant is bad is by observing what it smells and looks like. If there are foul odours, lumps and growths on the surface, or discolourations in the cutting fluid then it is likely to be bad. You can further test it by pH and conductivity testing, however you may need a technician for these tests.


